The Calamity of the 1st MTP fusion…


MTP = MetaTarsoPhalangeal, the joint at the ball of your foot where your toe joins…also the joint where patients develop bunions.

untitled

I’m not even sure where to start with this blog, my heart breaks every time I see a patient with a 1st MTP fusion…usually they are fused bilaterally. It is a biomechanical disaster that should essentially never happen.

Why do patients have this debilitating procedure?

  • They have 1st MTP joint pain.
  • They have radiographic evidence of 1st MTP degeneration (osteoarthritis).
  • Failed conservative management (arch supports, physical therapy, and medications).

Surgeons motivated to help the patient with their only real tool: surgery and NOT understanding the consequences of fusing this MOST critical joint in ambulation.

What leads to 1st MTP degeneration? Unless you are a ballerina, you have earned a degenerative 1st MTP through bad biomechanics and physics. The most common cause I see for 1st MTP pain and degeneration is a collapse of the Metatarsal or Transverse Arch which is also frequently a victim of further biomechanical issues.

Treatment of 1st MTP pain?

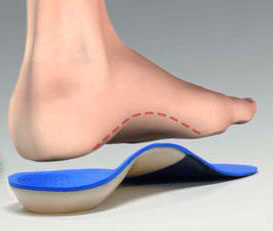
  1. Fix the biomechanics…this usually entails an Orthotic…NOT AN ARCH SUPPORT. (See my post on the difference between a biomechanical orthotic and a “custom” arch support)
  2. Get the 1st MTP joint moving.
    1. Treat the soft tissue on the medial (inside) and plantar (bottom) of the joint.
    2. Mobilize the joint (1st MTP extension in sagittal alignment).
    3. If the 1st MTP has been dysfunction for a long time, there is likely restriction of the plantar fascia and that will need to be treated too.
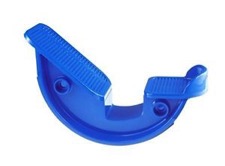
    4. This is NOT a problem that can be fixed with patient stretching exercises, however use of a “Prostretch” device can be a helpful addition to manual therapy intervention.
      1
  3. NEVER consider surgical fusion of this joint!!! 5 degrees of motion is a whole lot better than zero. It may make the 1st MTP joint feel better to be fused, but it doesn’t fix the problem that caused it to fail in the first place and it forces further compensations up the lower extremity chain of joints where the patient will likely begin to manifest other symptoms (hip/back most common).


The Courses I’ve Taken and Taught on Biomechanics and Running

photo 1

I recently returned for a Continuing Education Course on biomechanics of gait, running and rehabilitation titled: Running Rehabilitation and after this weekend my total hours of continuing education on gait stands at 120!!

  • 1996 Locomotor Biomechanics (8 hrs)
  • 1997 Orthotic Reaction (22 hrs)
  • 1998 Grinders & Glue (16 hrs)
  • 1998 Landing on Your Feet (8 hrs)
  • 1998 Current Concepts in Biomechanics (22 hrs)
  • 2000 When the Foot Hits the Ground (Lv2) (15 hrs)
  • 2001 The Running Course (15 hrs)
  • 2015 Running Rehabilitation (14 hrs)
IMG_2426
I certainly learned a couple things from my most recent course.  First, the science of running has certainly evolved in the last 14 years but the course also validated that all the work I invested to become a Subject Matter Expert in Biomechanics has certainly paid off.  To summarize that work I thought I’d list my teaching experience…
  • 1999-2000 I re-wrote 32 hours of gait and biomechanics for the Army-Baylor Physical Therapy Program.
  • 1999 University of Texas Health Science Center, Normal Gait (4 hours)
  • 1999 Balboa Naval Medical Center (Tricare Region IX), Lower Extremity Treatment Options (15 hours)
  • 2000 Etiology of Foot Pain, Health Care Providers in Bosnia (8 hours)
  • 2000  Army Orthopedic Physical Therapy Residency, Normal Gait and Malalignments (15 hours).
  • 2002 Army Orthopedic Physical Therapy Residency, Normal Gait and Malalignments (15 hours).
  • 2002 Colorado Springs Air force and Army Cont. Ed.  Normal Gait, Malalignments and Orthotic Prescription (15 hours)
  • 2003 Hawaii APTA, Normal Gait, Malalignments and Orthotic Fabrication (15 hrs)
  • 2003 Army Sports Medicine Physical Therapy Residency, Normal Gait, Malalignments and Orthotic Prescriptions (15 hours).
  • 2005 Hawaii APTA, Normal Gait, Malalignments and Orthotic Fabrication (15 hrs)
  • 2007 Operation Iraqi Freedom Deployment Cont Ed. Foot Pain Management in a Deployed Setting. (8 hours).
  • 2009 Kentucky APTA, Normal Gait, Malalignments and Orthotic Fabrication (15 hours).
  • 2010 Texas APTA, Normal Gait, Malalignments and Orthotic Fabrication (15 hours).
  • 2011 Washington APTA, Normal Gait, Malalignments and Orthotic Fabrication (15 hours).
That is a total of just over 200 hours of teaching to hundreds Physical Therapy students, graduates and and post graduate specialists.  I don’t proclaim this accomplishment to brag about what I’ve done, but to give God glory for the opportunities He’s afforded me.  I’m also realizing I haven’t taught a course in 4 years…I need to get off my butt and put on another conference!! 🙂
photo 3

Custom Orthotics By Providing Video Gait Analysis

I’ve had a lot of interest in my Bare Necessities  Custom Orthotics (arch supports or shoe inserts) from people across the country and I’ve had good success making them based off the information below. If you’ve read my post on the Fallacy of Arch Supports, you know that one of the components of my exam that makes the orthotic successful is the dynamic gait analysis, so if I’m provided the video footage I’ll have great insight into your biomechanics and if they need any help or correction.

The good news is that I’ll assess your videos FREE!! All I need is 10 second clips of you walking barefoot on the treadmill from behind and from each side.   Just do your best to walk on the treadmill at your comfortable walking pace.  Take video footage of the following angle/level  (including both sides/foot):

IMG_2421 IMG_2426

I’ll need a tracing of your foot next to a ruler. See picture below (it doesn’t have a ruler but you’ll need a ruler next to your tracing).  The tracing will let me know what size of orthotic to make and I’ll have an idea what adaptations your biomechanics have forced your foot to make and that will be even more information helping to guide my orthotic prescription.

IMG_2428

IMG_2431The orthotics themselves are only an average cost of $85 plus $10 shipping and handling, so send me your videos and get on the road to pain free walking or running.

Now that we are relocating to Laramie, WY please refer your Colorado Springs friends to this post.

Please email me your video and foot tracing to tony@barept.com

LTC Tony Bare (ret), DPT, ATC, OCS
Physical Therapist
Laramie, WY

The Fallacy of Arch Supports

orthotic-picture1

Have you been told you need foot surgery? Have you been failed by physical therapy? Orthotics (shoe inserts)? Podiatry (cortisone injections)? Have you been told surgery is your last option?

Please let me share three things I’ve learned as a 15 year military expert on foot mechanics, pain and dysfunction:

  • There is nothing a foot surgery can’t make worse
  • You can’t “unsurgery”
  • Foot surgery is like a potato chip….hard to stop at one

Step 1
Why did conventional physical therapy fail you?
You were treated with modalities (ultrasound, heat, electrical therapy), stretching, strengthening and balancing exercises…you may have received massage or myofascial release. You probably did get some relief but never complete and always temporary….why?
NONE of the above treatments addressed the cause of your pain….just the symptoms. Once your cause is addressed all of these treatments become amazingly effective!

Step 2
Next, you receive a cortisone injection. You may have felt great for hours, days or maybe months but gradually your symptoms returned and you were ready for your next injection and the next and the next. There are consequences to a single cortisone injection let alone multiple injections. Please do your research!

Lastly, this injection also fails to address the cause of your foot pain, the reason why your symptoms return eventually.

Step 3
Orthotics (shoe inserts)
these may be included as a part of physical therapy or podiatry treatments. Why have they failed you?

Failure 1: Your assessment

How detailed was your orthotic evaluation? Were your feet glanced at?
Maybe your health care provider watched you walk back and forth across a clinic floor. Maybe you just stepped in a foam box or had your foot casted.

My evaluation includes detailed assessment of your:

  • Current shoes and any inserts that either came in your shoes or were purchased separately
  • Static standing posture of your leg/ankle/foot. Static prone posture of your leg/ankle/foot
  • Dynamic (treadmill) barefoot multi directional gait analysis

 Failure 2: Your orthotic construction/development
The most common error? You’ve been fitted with an arch support. Your arch was NEVER designed to be a primary weight-bearing structure. An arch support does very little to correct the mechanics of your foot and that’s what has led to your foot pain, leg pain, knee pain or hip pain. To make matters worse the forced correction into your arch can be so uncomfortable that you won’t even wear them. On the rare occasion that your orthotic has a mechanical correction, it’s often based on a faulty or incomplete assessments. See Failure 1 above.
Lastly, your orthotic has been constructed of a rigid unforgiving plastic shell. This shell does not allow your foot to flex, adapt and function normally and can create another series of issues.

Step 4: Surgery
Don’t go here! Please let me see you first. My assessment is free . If I feel I can help you with orthotics, my average cost is only $85. Please read my testimonials on this website and Facebook.

LTC Tony Bare (ret), DPT, ATC, OCS
Physical Therapist
Laramie, WY